You have no items in your shopping cart.

Blog

Design Signs Online


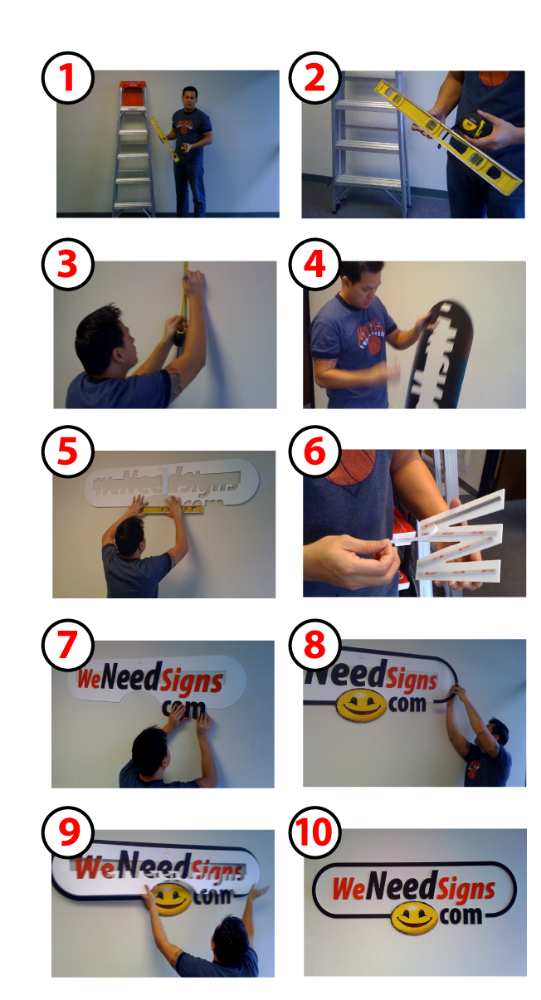
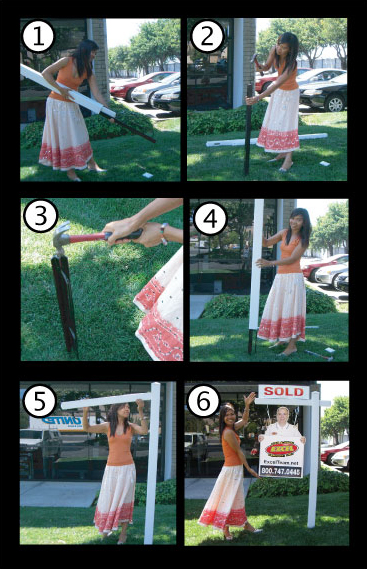
Designing signs online is getting easier all the time. WeNeedSigns.com has the tools and ability to import picture files so you can create your own look.  Designing online is not for everyone so we also have a fully staffed art department to help you with a look that best represents you and your company. A Fremont Bay Area Sign Company, we wanted to be more innovative to help those who wanted to be able to create their own designs and order them as needed.  We can also create custom pages for custom products you may need, but do not see on the website. Check out the site and if you need a different product, contact us and we can assist you in creating a look and product that will make you look good.

Installing a WeNeedSigns Wall Sign

Lobby logos or cut-out wall graphics are a great enhancement to your business or retail setting.

www.WeNeedSigns.com makes a wide variety of these type of signs and sell a 1/4″ thick expanded PVC wall graphic that is great looking, durable, light and very easy to install.

  1. Make sure the surface is clean and dry. If you have just painted, be sure the paint has a chance to dry for 10 days or so to be sure it is fully cured.
  2. Tools: You will need a ladder, level, tape measure and a pencil.
  3. Placement: Measure the center of the wall or mark where you would like the center of you wall sign. Mark the height of where you would like the “Bottom of the sign”. The bottom of the sign shouldn’t be less than 5-1/2′ from the bottom of the floor, or shouldn’t crowd the ceiling.
  4. Preparing the template: Remove the paper cover from the adhesive tabs on the back of the template.
  5. Placing the template: The template will have a center mark on the front side. Align the center mark of the template with the center mark you made on the wall. Use your level to make sure the template is not crooked. Press down gently on the adhesive tabs to make sure the template is secure and will not move. Step back to see that the sign looks straight and is not too low or too high before sticking on the letters.
  6. Placing the letters: All the letters will come with a very high bond or “VHB” foam tape on the back of all the parts. Simply peel off the paper cover off the tape and gently place the letters in the template making sure the bottom of the letters are touching the bottom of the template cut-out.
  7. Securing the letters: After placing the letters on the wall, take time to look back at the graphic and make sure everything looks straight and centered. Press the letters down firmly after you are sure the letters are straight.
  8. If you are applying a boarder remove the paper cover off the left end of the boarder first and apply the first side then come back and remove the paper cover off the right side and apply the graphic. This way you will not stick down parts of the boarder until you can handle it. The PVC is flexible and the tape will be put on the boarder so that the process will be easy to handle.
  9. Remove the template: After all the graphics are applied on the wall and you have checked to make sure the tape is secured and well bonded, carefully remove the template from around the letters.
  10. The WeNeedSigns wall sign is now complete and you now have a great professional wall graphic that will last for years.
Real Estate Sign Posts

In all my 30 years experience in the signs industry, the best way I have ever seen to install real estate signs is with a PVC cross arm sign post. The look and ease of installation is second to none. We have designed our post to the highest specifications of materials and the best size, suited to appear balanced to show a classic look. Both www.ExcelTeam.net and www.WeNeedSigns.com carry the post and our customers from Hawaii to Maine tell us it is the best value product in the industry.

The images show you how easy it is to install and it pays for itself the first time you use the Excel Real Estate Sign Post.

Greg Pelican
Excel Sign & Decal Co., Inc.
41353 Albrae Street
Fremont, CA 94538
PH. 800-747-0445
FX. 510-651-0444

Basic Design Layout

The best way to start a sign design is to decide on a size.  If you have a size restriction and you want the bests results on the design be sure you keep your message clear and simple.  No more than 3 colors and never make the sign too wordy.

A common mistake for the designer is to use a busy color combination or background.

Remember the three fundamental rules to designing, (1) KEEP  (2) IT  (3) SIMPLE.

Two to three colors is all you need with signs and be sure if you have more than one sign you should use the same color combination, font styles, text sizes and spacing.  Designing signs online or with a computer has never been easier. The editing abilities of the computer makes trial and error less cumbersome and allows people to design their message the way they would like to see it.   My next BLOG I will share with you some ideas I have learned in my 33+ years in the sign industry that helps the sign message stand out, making you look good!